
| Chapter 4 |
Chapter 4
Additional Editing
This chapter tells you how to perform additional editing tasks associated with the MAX Data Entry System. (Chapter 3 of this manual presents basic editing techniques.) This chapter contains the following modules:
Using Growth Rates
How Discretionary Outlays are Calculated
Using the Setup Outlay Calculations
Copying Outlay Setup Information From the Previous Budgetary Resource Line
Adding a Comment to an Amount
Changing a Comment
Deleting a Comment
Printing Data from an Account on the PC
Saving an Account as a New Version
Restoring Account Data
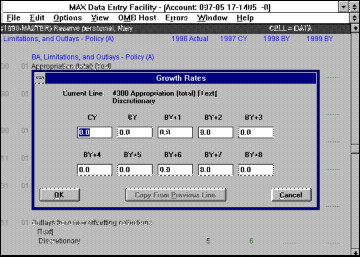
Using Growth Rates
Instructions
| Step | When you do this... | ...the system does this. |
| 1 | Select the BA, Limitations, and Outlays schedule-Policy (A). | Displays the account at the beginning of the BA, Limitations, and Outlays schedule you selected (policy). |
| 2 | Position the cursor bar on the CY budget resource amount. | Highlights the amount. |
| 3 | Select the EDIT-GROWTH RATES option. | Displays the Growth Rates box. |
| 4 | TAB to the CY row. Enter the CY growth rates (percentages). Then use the TAB key to advance through the fields. | Calculates the budget resources amounts for BY - BY+8 using the growth rates. |
Exhibit
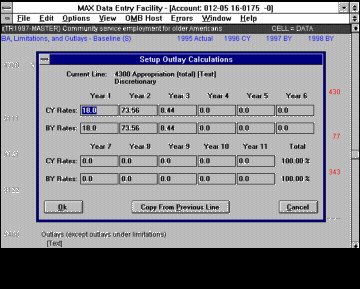
How Discretionary Outlays Are Calculated
Instructions Automatic Outlay Calculations
Discretionary outlay data are automatically calculated by the MAX system. (You must first add in outlay lines needed.)
You must:
For Baseline, enter the enacted budgetary resource level (CY) split by BEA, Sequester/Exempt, Pay/Non-pay categories in Schedule S.
For Policy, enter the enacted budgetary resource level (CY) by BEA category in Schedule A.
enter the outlay dollar amounts associated to end of PY balances in either lines 9122 (Outlays from end of PY balances of authority), 9322 (Outlays from end of PY balances of spending authority from offsetting collection) or 9822 (Outlays from end of PY balances of limitation). [MEMORANDUM ENTRIES -- MAX will automatically add these amounts to the calculation of line 9X21.]
use the Setup Outlay Calculations option (Under the EDIT menu) to:
-- enter spend-out rates for the CY budgetary resource, and
-- enter spend-out rates for the BY budgetary resource.
Using this information, the application generates the CY through BY+9 outlay for new and prior lines. You also have the option of using MAX's automatic outlay generation feature to calculate mandatory outlays.
Notes
You can alter the discretionary outlays by adjusting either the BA/limitation or spendout rates.
Using the Setup Outlay Calculations
Instructions
| When you do this... | ...the system does this. | |
| Select the BA, Limitations, and Outlays schedule (baseline or policy). | Displays the account at the beginning of the BA, Limitations, and Outlays schedule you selected (baseline or policy). | |
| Position the cursor bar on a budgetary resource amount (e.g., CY amount on line 4300); then select the EDIT-SETUP OUTLAY CALCULATIONS. | Displays the Setup Outlay Calculations box. | |
| TAB to the CY row. Enter the CY spend-out rates (percentages). Then use the TAB key to advance through the fields in the CY row. | Calculates the total for the CY spend-out rates for this row (which should not total to more than "100%"). | |
| TAB to the BY row. Enter the BY spend-out rates (percentages). Then use the TAB key to advance to the fields in the BY row. | Calculates the total for the BY spend-out rates for this row (which should not total to more than "100%"). | |
| When you are satisfied with the spend-out rates entered, select the OK button. | Recalculates the amounts for the outlay lines based on the information entered in the Setup Outlay Calculations box. |
Notes
Automatic outlay calculations apply only to discretionary lines in the BA, Limitations, and Outlays schedules.
Exhibit
Copying Outlay Setup Information From the Previous Budgetary Resource Line
Instructions
| When you do this... | ...the system does this. | |
| Select the BA, Limitations, and Outlays schedule (baseline or policy). | Displays the account at the beginning of the BA, Limitations, and Outlays schedule you selected (baseline or policy). | |
| Position the cursor bar on the budgetary resource line you want to copy outlay setup information to; then select the EDIT-SETUP OUTLAY CALCULATIONS. | Displays the Setup Outlay Calculation box. | |
| Select the Copy From Previous Line button. | Copies the spend-out rates from the previous line. | |
| Select the OK button. | Recalculates the outlays amounts based on the copied spend-out rates. |
Notes
Spendout rates must be used to calculate discretionary outlays, but you have the option of using spendout rates to calculate mandatory outlays.
This function takes outlay calculations from a previous line and copies them to a target row (i.e., where the cursor bar is located) further down in the account file. Consequently, you must perform this function working from top to bottom in the account file. You cannot copy outlay calculations "up" in the account file.
The Outlay Setup information is applied to subfunction/BEA lines.
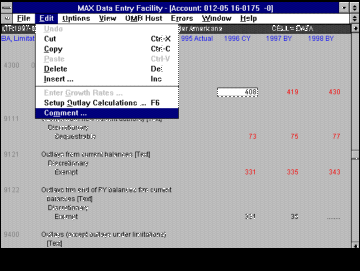
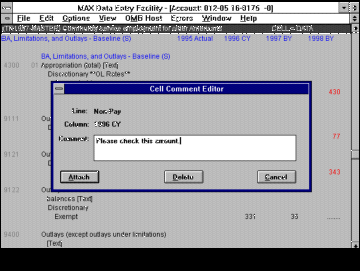
Adding a Comment to an Amount
Instructions
| When you do this... | ...the system does this. | |
| With an account file open on your PC, position the cursor bar on the amount to which you want to add a comment. Then select the EDIT-COMMENT option. | Displays the Cell Comment Editor box with the cursor in the Comment field. (Also displays the applicable line title and column heading.) | |
| Type in the text of the comment (there is an 80-character limit). | ||
| Select the Attach button. | Redisplays the account file with the user-selected amount marked with an asterisk ("*") immediately to the right of the value. This indicates a comment has been added to this specific amount value. |
Notes
Comments can only be attached to amounts. The comment may be up to 80 characters (that is, letters, numbers, or special characters). Any amount with a comment attached to it will have an asterisk beside it. There is a maximum of 10 comments per account. Comments you add remain with the amount when the account is uploaded to the OMB Host.
Exhibit
Changing a Comment
Instructions
| When you do this... | ...the system does this. | |
| With an account file open on your PC, position the cursor bar on the amount whose comment you want to change. (Note: The amount must be marked with an asterisk ("*") immediately to the right of the value.) Then select the EDIT-COMMENT option. | Displays the Cell Comment Editor box with the cursor in the Comment field. (Also displays the applicable line title and column heading.) | |
| Use a combination of the DELETE, BACKSPACE, and INSERT (for "typeover" typing mode) keys, as well as re-typing, to edit the comment text as applicable. | ||
| When you are finished, select the Attach button. | Redisplays the account file with the user-selected amount marked with an asterisk ("*") immediately to the right of the value. |
Exhibit
Deleting a Comment
Instructions
| When you do this... | ...the system does this. | |
| With an account file open on your PC, position the cursor bar on the amount whose comment you want to delete. (Note: The amount must be marked with an asterisk ("*") immediately to the right of the value.) Then use the EDIT-COMMENT option. | Displays the Cell Comment Editor box with the cursor in the Comment field. (Also displays the applicable line title and column heading.) | |
| Select the Delete button. | Redisplays the account file with the user-selected amount no longer marked with an asterisk ("*"). (This indicates a comment does not exist for this amount.) |
This Page is Left Blank Intentionally
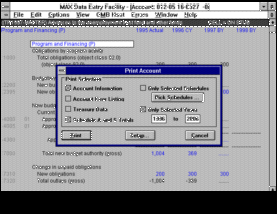
Printing Data From an Account on the PC
Instructions
| When you do this... | ...the system does this. | |
| With an account open on your PC, select the FILE-PRINT option. | Displays the Print Account box which
lists six print options:
a. Account Information (this option is already marked with an "X") b. Account Error Listing c. Treasury Data d. Schedules A and S Totals e. Only Selected Schedules f. Only Selected Years | |
| Select the desired print option. (You may select any combination of these six options.) | Places an "X" in the squared brackets corresponding to the desired option(s). | |
| Select the Print button. | Sends the user-specified report(s) to print. |
Notes
You can only print the information from the open account. To print more than one account, select FILE-OPEN option and highlight the accounts you want to print and click-on the Print button. You can also print from the OMB Host. (Refer to the "Submitting Reports on the OMB Host" module in chapter 2.)
If you make a mistake in marking an option for printing, position the cursor bar on that option and click-on it to "unmark" it.
Exhibit
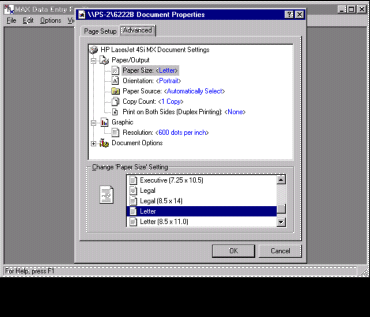
Print Setup
Instructions
| Step | When you do this... | ...the system does this. |
| 1 | Select FILE-PRINT-SETUP. | Displays a Printer Selection box. |
| 2 | Select your printer and click on the Setup button. | Display a Page Setup box with available options. (The dialog boxes are the same ones you would see in Windows software) |
| 3 | Select the options desired and click on the OK button. | Displays a Printer Selection box. |
| 4 | Click on the OK button. |
Exhibit


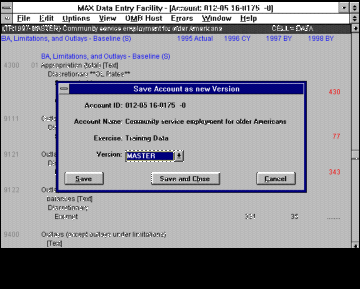
Saving an Account as a New Version
Instructions
| When you do this... | ...the system does this. | |
| With an account open on your PC, make your modification(s) as applicable. | ||
| Select the FILE-SAVE AS option. | Displays the Save Account As New Version box with the version field highlighted. | |
| Click on the down arrow in the version field to see options available. | Displays the choices for version types: MASTER, Alt 1, Alt 2, and Alt 3. | |
| Select the version type you desire. | ||
| a. Select the Save button.
b. Select the Save and Close button. |
Saves the changed version of the account
and leaves it open with the last cell
changed highlighted.
Saves and closes the changed version of the account; then displays the MAX Data Entry application with no account loaded. |
Notes
The accounts in the master version are the official accounts used to print the budget. Each account can be placed in up to three alternative versions. Each alternative version serves as a temporary repository where you can store a copy of an account someone else has reserved.
At the start of an exercise, OMB loads master versions with data. Also, at the start of an exercise no alternative versions exist because they were deleted at the end of the previous exercise.
How might you use the concept of alternative versions? Say you are an agency user who reserves and downloads the master version of an account on Monday morning. On Tuesday you attempt to upload your changes to the OMB Host but find that your examiner changed the account on Monday afternoon. You want to place your copy of the modified account data on the OMB Host, but not write over your examiner's changes. What you do is upload the account into the account's first alternative version. At this time your examiner can view the data at his convenience.
Exhibit
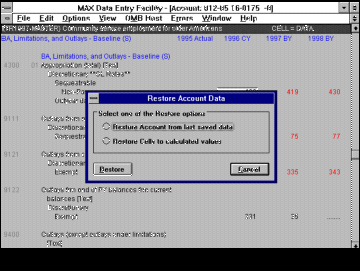
Restoring Account Data
Instructions
| When you do this... | ...the system does this. | |
| If you make modifications to an account file you do not want to save, select the OPTION-RESTORE DATA option. | Displays the Restore Account Data box. | |
| Select either Restore Account from Last Saved data or Restore Cells to Calculated Values. | ||
| Select the Restore button. | Restores account from last save -- The
system undoes all changes made to the
account since the last save, including line
numbers, line titles, and amounts.
Restores cells to calculated values -- The system remove all overridden values in the account. |
Notes
This function is equivalent to closing (without saving) and re-opening the account.
Exhibit
The Budget | Legislative Information | Management Reform/GPRA
Grants Management
Financial Management | Procurement Policy | Information & Regulatory Policy
Contact the White House Web Master
Privacy Statement