
| Chapter 5 |
Chapter 5
Reviewing Data
This chapter tells you how to perform tasks associated with viewing (but not modifying) account data. This chapter contains the following modules:
- Checking Errors For a Schedule or Account
- Viewing the Pay/Non-Pay Deflators Being Used
- Comparing User-Entered Totals Against System-Generated Totals
- Viewing Total for Schedule A & S
- Viewing an Account's Treasury Data
- Viewing Budget Account Level Information
- Viewing Outlay Calculations
- Viewing New and Changed Edit Rules
- Comparing Accounts
Checking Errors For a Schedule or Account
Instructions
Checking Errors in a Specific Schedule
| When you do this... | ...the system does this. | |
| With an account open on your PC, position the cursor bar on a detail line within the schedule for which you want to check for errors. Select the ERRORS-CHECK SCHEDULE option. | Displays the Errors Listing for Account box which contains a list of errors for only the schedule you selected. | |
| If the system generates a long list of errors, click on the UP/DOWN ARROW keys to view the errors in the list. | Scrolls down in the list to display all the errors associated with the user-specified schedule. | |
| a. Select the Explain button if you want
to see what schedule(s) and line number(s) were used to calculate the error. OR b. Select the Cancel button when you have completed viewing the list. c. If desired, select the Print button. |
Display the formula used in calculating
the error message.
Redisplays the account. Prints the list shown in the Error Listing box. |
Checking Errors in an Entire Account
| When you do this... | ...the system does this. | |
| With an account open on your PC, select the ERRORS-CHECK ACCOUNT option. You can sort the error messages by schedule or year (ERRORS-SORT TYPE) | Displays the Error Listing box which contains a list of errors for the account. | |
| If the system generates a long list of errors (as is more likely with this option), use the UP/DOWN ARROW keys to view all the errors in the list. | Scrolls down in the list to display all the errors for the account. | |
| a. Select the Explain button if you want
to see what schedule(s) and line number(s) were used to calculate the error. OR b. Select the Cancel button when you have completed viewing the list. c. If desired, select the Print button. |
Display the formula used in calculating
the error message.
Redisplays the account. Prints the list shown in the Error Listing box. |
Notes
When two (or more) lines are cited in an error message, the first line is the one that triggered the error message.
Exhibit


Viewing the Pay/Non-Pay Deflators Being Used
Instructions
| When you do this... | ...the system does this. | |
| With an account open on your PC, select VIEW-PAY/NON-PAY DEFLATORS option. | Displays the OMB Pay/Non-Pay Deflators box which lists the civilian pay, military pay, and non-pay deflator rates. | |
| Select the OK button when you have completed viewing the information. | Redisplays the account. |
Notes
This set of deflators is used by all accounts in the MAX database. Deflators are used only in the baseline BA, Limitations, and Outlays schedule.
Exhibit

Comparing User-Entered Totals Against System-Generated Totals
Instructions
| When you do this... | ...the system does this. | |
| With an account open on your PC, position the cursor bar on the total amount for which you want to compare values. Select the VIEW-TARGET VS. CALCULATED VALUE option. | Displays the Target Value Status Check box which contains the target value (the user-entered amount) and the computed amount. | |
| a. If you want to replace the user-entered
amount with the system-generated
amount, select the Replace Entered
Value button.
b. If you DO NOT want to replace the user-entered amount with the system-generated amount, select the Cancel button. |
Replaces the value original amount (the
target value in the box) with the
computed amount.
Redisplays the account. |
Notes
Use of this function may be helpful to determine an amount needed when you must reach a known target level. To replace all user-entered totals with system-generated totals, use the OPTIONS-RESTORE DATA option. When the Restore Account Data box displays, use the "Restore cells to calculated values" option.
Exhibit

Viewing Total for Schedules A & S
Instructions
| When you do this... | ...the system does this. | |
| With an account open on your PC, position the cursor bar on the line (within the BA, Limitations, and Outlays schedule) for which you want to display the totals. Select the VIEW-TOTALS FOR SCHEDULES A&S option. | Displays the totals for budget authority and outlays. | |
| Use the UP/DOWN and LEFT/RIGHT ARROW keys to view all the totals in the list. | Scrolls down and across the listing to display all the totals associated with the user-specified line. | |
| Select the OK button when you have completed viewing the list. | Redisplays the account. |
Exhibit

Viewing an Account's Treasury Data
Instructions
| Step | When you do this... | ...the system does this. |
| With an account open on your PC, select the VIEW-TREASURY DATA option. | Displays the Treasury Annual Report Appendix Data box which lists the Treasury balance, actual budget account balance, and any differences between the Treasury and budget balances. | |
| Select the OK button when you have completed viewing the list. | Redisplays the account. |
Exhibit

Viewing Budget Account Level Information
Instructions
| Step | When you do this... | ...the system does this. |
| 1 | With an account open on your PC, select the VIEW-BUDGET ACCT LEVEL INFO. | Displays the budget account information (Agency, bureau, subfunction, character class, limitation code, and etc.) |
| 2 | Select the OK button when you have completed viewing the information. | Redisplays the account. |
Exhibit

Viewing Outlay Calculations
Instructions
| Step | When you do this... | ...the system does this |
| 1 | With an account open on your PC and with the cursor on an outlay amount (i.e., number 9xxx) in Schedule A or S, select the VIEW-OUTLAY CALCULATIONS option. | Displays the Outlay Calculations box which list budget authority, spendout rate, and outlay amounts. |
| 2 | Select the OK button when you have completed viewing the information | Redisplays the account. |
Exhibit

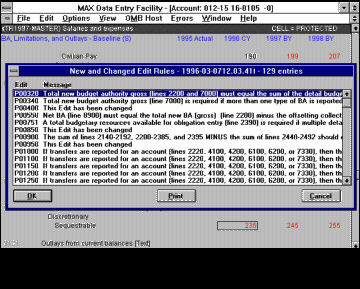
Viewing New and Changed Edit Rules
Instructions
| Step | When you do this... | ...the system does this |
| 1 | With an account open on your PC, select
the VIEW-LAST CHANGED EDITS
LIST option.
. |
Displays a list of all the edits that have been changed in the system. |
| 2 | Select the OK button when you have completed viewing the list. | Redisplays the account. |
Exhibit
Comparing Accounts
Instructions
| Step | When you do this... | ...the system does this. |
| Select the FILE-COMPARE ACCOUNTS option. | Displays the Select Two Accounts to Compare box which lists the accounts available on the system. | |
| Select two account files you would like to compare. | Highlights the accounts. | |
| Select the Compare button. | Processes the comparison of the two user-specified accounts and displays the results in the List of Account Differences box. | |
| If the system generates a long list, use the UP/DOWN ARROW keys to view all the compared items in the list. | Scrolls through the listing to display all compared items. | |
| a. After you have completed viewing
the list, select the Cancel button.
b. Select the Print button if you wish to print the results. |
Exits to the MAX Data Entry application
main menu (with no account loaded).
Prints the comparison listing. |
Notes
The comparison is line-by-line and includes a brief narrative description of the differences between the two accounts.
The system makes its comparisons using copies of the accounts on your PC's disk drive. This means that if you are editing an account and want it to be one of the two accounts compared, you must use the FILE-SAVE option before using the FILE-COMPARE ACCTS option.
Exhibit


The Budget | Legislative Information | Management Reform/GPRA
Grants Management
Financial Management | Procurement Policy | Information & Regulatory Policy
Contact the White House Web Master
Privacy Statement